Steak Done Just Right #TuesdayTip

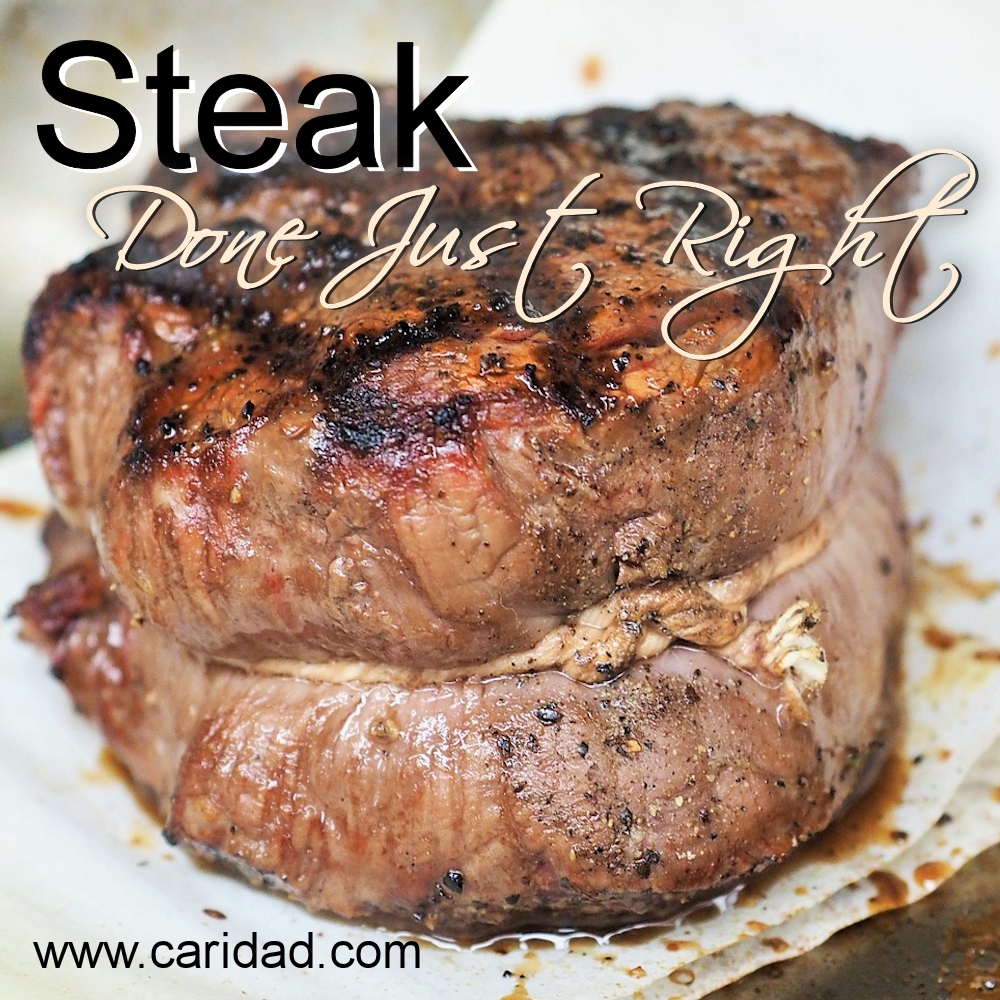
We love steak, but since we can’t have a gas/charcoal BBQ anymore, we’ve had to experiment with how to grill steak just right and have finally found the way!

For starters, you’ll need a nice thick cut of beef – about an inch thick. Whether it’s London Broil or a more expensive cut of meat, this will work for you. When I do London Broil, I generally marinate it, but that’s not a necessary part of this recipe.

What you will need is a pan that you can get really hot. I recommend something like the Lodge Cast Iron Square Grill. This Lodge grill is pre-seasoned which is great although it’s not that tough to season cast iron. Just clean it when you buy, oil it up and let it sit in a low temp oven. Once you’ve got that first coat, be sure not to scrub too hard when washing. Just a little soap and water. Nothing beats cast iron for cooking.

Except maybe black steel or carbon steel. These pans are lighter, but can deal with high heat situations. They need seasoning as well, so a pre-seasoned one is your best bet.

Back to the steak. Preheat your oven to 250 degrees. Once it’s heated, place the steak on an oiled pan and cook for about 30 minutes or until the internal temp is 125 degrees.

Then, remove from the heat and get the cast iron/black steel pan heating. Give it a little spray of cooking oil and once it’s hot enough to be smoking, add the steak. Sear each side for one minute or until the internal temp is about 140 for medium rare or 155 for medium.

How can you tell the temperature? I highly recommend one of the instant read thermometers. They can be pricey, like the Thermoworks, but it is worth it.

Once you’ve seared the steak, set it aside off the heat for 10 to 15 minutes. Why should you let it rest? Heat forces the juices toward the center of the steak and if you cut it immediately, those juices will run out of the center. Letting the meat rest will allow the juices to flow back through all the parts of the steak. For a more scientific explanation about the benefits of resting meat, you can visit the Food Lab!

Use this process for any other meats you might want to grill, like lamb or pork chops!
steak

Christmas Cookie Countdown & How to make them healthier #TuesdayTip #HealthyLiving #Recipe

I’m not really a baker, but I love cookies and cakes! Especially cookies. This time of year is both glorious and difficult since I’m sticking to my goal of eating healthier, but those Christmas cookies and treats are so so tempting.

Today’s tip is simple: A link to the awesome Betty Crocker Christmas Cookie Countdown. If you can’t find a cookie that you’ll like on there . . . Well, I don’t know what to say to that.

As for me, I’ll try a couple of these when I have more time and I think I’ll try making some of them healthier with some substitutions. For example, you can substitute a can of diet soda or seltzer in brownie and cake mixes instead of the oil and eggs. Applesauce and mashed bananas can be used as well in lieu of the oil for some cakes, brownies and cookies. You can click here for The Ultimate Guide to Healthier Baking infographic which has a number of other substitutions you can make for healthier eating.

Coconut Oil has also become one of those things to have handy and use as a substitute for butter. Click here for the 10 Best Sugar Cookie Recipes Using Coconut Oil!
Cookiecountdown

Grilled Radicchio, Romaine & Chicken Salad #FoodieFriday

Yes, you are reading that correctly. It’s not just the chicken that’s grilled, but also the radicchio and romaine! You’ll think it’s crazy, but that slight little char on the green stuff creates an amazing flavor. It takes a little longer to make your salad, but it’s worth the effort. This recipe is for two, so double the greens and/or chicken as necessary.

Ingredients

2 Chicken Breasts – Halved lengthwise
2 tbsp Dijon mustard
2 lemons
1/2 cup olive oil
3 cloves garlic
radicchio head – halved
romaine head – halved
Salt
Shaved parmesan curls (As much as you want)
1/2 cup chopped walnuts

Directions

Marinate the chicken breast in the mustard and juice from one lemon. If you can, do this for about an hour.

Oil your grill and pre-heat it.

Rub 1/4 cup olive oil on all sides of the radicchio and romaine heads. Salt, but not too much since the parmesan has a lot of salt. Put a skewer through the 3 garlic cloves.

Place both the radicchio, romaine and skewered garlic on your grill. You want to leave them on there until you get a little bit of char on the leaves and cloves. Maybe 5-10 minutes depending on your grill. Once the first side is grilled, flip on the other side until you get the first bit of char, then remove from heat.

Place the marinated chicken breasts on the grill. I halve them so they will cook faster, but they could dry out, so watch them while you prep the rest of the salad.

Chop the radicchio and romaine and place in bowl. Chop the garlic and add to greens. Sprinkle the chopped walnuts and parmesan curls over the greens. You can make parmesan curls by running your vegetable peeler across a nice chunk of parmesan. Drizzle the remaining 1/4 cup olive oil and the juice of the remaining lemon over the greens.

Once cooked, slice the chicken breasts lengthwise and place over the salad. Voila! A very different salad for you. To change it up, try using blue cheese instead of parmesan and/or add craisins or other fruit. You’ll love it!

grilledsalad

#FreebieFriday #FoodieFriday #Recipe Help for the Weekend

Happy Friday! I’m getting ready for the Easter weekend and one of the things I normally do is bake some goodies for Easter Sunday. There are some traditions, like the Italian Easter Egg bread (see below). But I also like to mix in some new things. To help us all find some new things, here are some freebie recipe books you may want to try out!

Just Desserts by Kemberlee Shortland

9 Types of Copycat Girl Scout Cookies: Your Favorite Copycat Girl Scout Cookie Flavors by Prime Publishing

101 Quick & Easy Cupcake and Muffin Recipes by Victoria Steele

A Baker’s Guide to Chocolate: A Collection of Recipes and Useful Information by Dennis Weaver

Whoopie PiesJul 12, 2013 by Tyrel Ferris and Taleah Ferris

And for those who have some dietary restrictions:

Gluten Free: Desserts – 50 Delicious Gluten Free Recipes For Celiac, Paleo And Gluten Free Diets (Health Wealth…by Charity Wilson

eastereggbread

Slow Cooker Roast Pork #FoodieFriday

With the winter weather the other day, we had to stay home and shovel snow. Since I was home, I wanted to put together something warm and tasty for that night’s supper and hauled out the Crockpot. This was also another cleaning out the fridge meal and what I had on hand was a pork loin roast, so that’s what I decided to cook. After a visit to Pinterest, I adapted one of the recipes for you!

Ingredients

3-4 pound pork loin roast
1 apple thinly sliced
1 orange sectioned and sliced
2 large onions sliced
1 cup teriyaki sauce
1/2 cup honey
2 cloves finely minced garlic

Directions

I didn’t cook my onions first, but I really think you should. The dish will be that much more sweeter and full of goodness. Otherwise, here’s what to do:

Take the pork roast and cut slits about one inch apart. Place a slice of orange and one of apple in each slit.

Layer the slow cooker as follows:

All the onions. Half of the remaining apples. The pork roast you sliced and filled. Sprinkle the garlic over the pork roast and nstle the rest of the apples around the roast. Mix the teriyaki sauce and the honey and spoon this over the pork roast.

Cook on high for 6 -8 hours until tender. Serve with rice and/or vegetables! That’s it! Hope you all have a good weekend!

PorkRoast

Upside Down Cornbread Cake and BE MINE Erotic Romance Release & #Giveaway #FoodieFriday

Happy Friday! Woo hoo we made it to the end of the week. I’ve got a busy weekend planned and I hope you have a great one.

Today I’m sharing a recipe that helps handle some of the leftovers from Thanksgiving. I love the Penguin Cornbread Mix from Costco, but always have a lot of it left over after the holiday. While we love cornbread in my house, I wanted to find a way to mix things up.

After checking out a few sites, I came across an upside down cake recipe from the fabulous Sunny Anderson and decided to adapt it to deal with the cornbread mix as well as the fruits I had handy, namely pears, apples and blueberries. You can actually make this with any fresh or canned fruit which is why I didn’t put any specific fruit name in the title. If using canned fruit, make sure to drain it well so you don’t water down the sauce for the topping.

Ingredients

2-3 cups fruit, sliced (except small fruits like blueberries)
1 cup brown sugar
1 stick of butter
1 cup rum/amaretto/or other sweet liquor
1 cornbread mix

Directions

Preheat oven to 350 degrees.

In a small saucepan, melt butter, add 1/2 cup brown sugar and still until dissolved. Add liquor and slow boil until the liquid is a little syrupy.

Make cornbread according to the mix and add the remaining 1/2 cup brown sugar.

Oil 9×13 inch pan. Layout the fruit in the bottom of the pan. Once the butter/sugar/alcohol mixture is syrupy, pour over the fruit. Then pour the cornbread mix over the fruit and syrup.

Bake for 30-45 minutes or until knife comes out clean from the cornbread. Let cool. Once cool, invert the cake onto another plate.

Serve with ice cream and/or whipped cream. The cake is dense and not too sweet. For those who need gluten free, this is a perfect recipe since corn does not have gluten. Just make sure to check the label of your cornbread mix to make sure there are no other products containing gluten.
Upside Down Cornbread Cake

BE MINE Valentine’s Day Erotic Romance Set

As I mentioned the other day, we’ve got an awesome box set for you for Valentine’s Day and it’s only 99 cents for a limited time. Check it out at these retailers:

Amazon: http://bit.ly/AMZBeMine
Amazon UK: http://bit.ly/AMZUKBeMine
Amazon CA: http://bit.ly/AMZCABeMine
Amazon AU: http://bit.ly/AMZAUBeMine
B&N: http://bit.ly/BNBeMine
Kobo: http://bit.ly/KoboBeMine

BE MINE — Ten Erotic Romances for Valentine’s Day features contemporary romance, paranormal romance, military romance, and BDSM romance from today’s New York Times and USA Today bestselling authors. This boxed set is ONLY available for a LIMITED TIME so get your copy before it’s gone.

So…won’t you Be Mine?

Be-Mine-99-Cent-Ad

a Rafflecopter giveaway

Zucchini Lasagna #Recipe

I’ve been trying to watch my carbs because that’s the one thing that really helps me lose weight and feel better. It’s tough, because I’m a carboholic, but recent studies indicate that diets that are lower in carbs are better than diets low in fat.

With that in mind, I’ve curtailed carbs and have lost over twenty pounds. This is, sadly, another of my downs on the roller coaster that is my weight, but still, better to be on the down side of it.

Since it has worked for me, I’ve been playing around with how to lighten the carbs in what would normally be carb heavy dishes, like lasagna. Last week I made a lower carb and lower fat lasagna for a holiday party. I’m sharing the recipe with you today!

Ingredients

4 to 5 medium zucchini, thinly sliced lengthwise
4 cups spaghetti sauce (if you don’t have any homemade, try Classico 4 Cheese Sauce)
2 pounds skim milk ricotta cheese
1 pound skim milk mozzarella shredded
1 cup grated parmesan cheese
1/8 cup chopped fresh parsley
1 egg
Olive oil
Barilla No Bake Lasagna Sheets

Directions

Preheat the oven to 350 degrees.

Place paper towels in a colander and empty ricotta onto paper towels. See Step 1 below. This is to help get rid of some of the extra moisture that can make your lasagna runny.

In a non-stick pan with very little olive oil, brown the zucchini slices and place on a paper towel to soak up any access oil. See Step 2. Some recipes call for using the zucchini raw, but again, this creates too much moisture and that brown on them is caramelization that adds flavor to the dish.

In a big bowl, beat the egg, add then add 1/2 cup parmesan cheese, 1/4 of the shredded mozzarella, the parsley and the ricotta. Mix until blended.

Once you’ve got all the zucchini cooked and the ricotta mix done, spray a 9×13 pan with a little oil and do a layer of spaghetti sauce. Just enough to cover the bottom. Add the first layer of Barilla No Bake sheets. I only use these at the top and bottom to strengthen the layers.

Spoon the ricotta mixture onto the lasagna sheets and smooth out. Then arrange the zucchini slices perpendicular to the lasagna sheets. Why perpendicular? To add body to the lasagna so it will hold together. See the Assembly photo below.

Top the zucchini slices with a little spaghetti sauce and 1/4 of the shredded mozzarella. No ricotta this layer.

Add another layer of zucchini slices perpendicular to the first layer. Again, alternate the layout of the slices to help stabilize the layers. Top this layer with some spaghetti sauce, the remaining riccota, and another 1/4 of the mozzarella.

Finish the top of the lasagna with the Barilla lasagna sheets running perpendicular to the layer below this. Smooth spaghetti sauce all over and make sure you cover every inch of the sheets, but don’t make it too wet. Top with the remaining mozzarella and parmesan cheese.

Bake for about 45 – 60 minutes. Let sit for about 30 minutes before serving.

ZucchiniLasagnaSteps