My Pinterest Recipe Board #FoodieFriday

Two years ago I had to have surgery on my knee and since I had to stay home, my daughter and I decided to do a week of recipes from our Pinterest boards. The really funny thing was that both of us had pinned many of the same recipes we wanted to try. We had a fun week of cooking and recuperating!

Today, I’m sharing my board with you. Check it out for recipes to make over the weekend or when you have a free moment.
Follow Caridad’s board Recipes on Pinterest.

Grilling Your Food & Health Risks #TuesdayTip

This morning I was reading a magazine that mentioned the risks of grilling your food and the connection to cancer. Apparently there is no hard evidence about this, although there are some studies that say that grilling, as well as broiling and frying, can create some compounds that are associated with certain cancers.

There are steps you can take to lower the risk (if it exists).

  • Cook for less time at a much higher temperature.
  • Lower the temperature and cook the meat/fish longer.
  • Trim fat so you don’t get a lot of drips and flare-ups.
  • Clean all charred bits off the grill and take them off your food.
  • Cook fish which doesn’t create as many of the compounds that could harm you.
  • Marinate your meat/fish and use spices like red pepper, rosemary and garlic.

Hope today’s Tuesday Tip was a help!
Grilling Tips

For additional reading on this subject, please try:

Eating Well
American Institute for Cancer Research
Rodale’s Organic Life
Prevention Magazine

Slow Cooker Roast Pork #FoodieFriday

With the winter weather the other day, we had to stay home and shovel snow. Since I was home, I wanted to put together something warm and tasty for that night’s supper and hauled out the Crockpot. This was also another cleaning out the fridge meal and what I had on hand was a pork loin roast, so that’s what I decided to cook. After a visit to Pinterest, I adapted one of the recipes for you!

Ingredients

3-4 pound pork loin roast
1 apple thinly sliced
1 orange sectioned and sliced
2 large onions sliced
1 cup teriyaki sauce
1/2 cup honey
2 cloves finely minced garlic

Directions

I didn’t cook my onions first, but I really think you should. The dish will be that much more sweeter and full of goodness. Otherwise, here’s what to do:

Take the pork roast and cut slits about one inch apart. Place a slice of orange and one of apple in each slit.

Layer the slow cooker as follows:

All the onions. Half of the remaining apples. The pork roast you sliced and filled. Sprinkle the garlic over the pork roast and nstle the rest of the apples around the roast. Mix the teriyaki sauce and the honey and spoon this over the pork roast.

Cook on high for 6 -8 hours until tender. Serve with rice and/or vegetables! That’s it! Hope you all have a good weekend!

PorkRoast

Egg Creams & Business Trips

Sorry for being silent, but I was away on business and it was impossible to blog. The trip went nicely. Business accomplished, delicious Kansas City BBQ tasted and even more awesome, I got to visit with some friends! Of course my little kitten Slate was not happy to see me go and wanted to sneak away with me!
10686919_10152578235585913_1237474556201101506_n

While I was away the topic of egg creams came up. Egg creams are a Brooklyn tradition and include neither eggs nor cream and are quite easy to make! Where does the name “egg cream” come from? Theories abound that it is because fountain sodas of that time sometimes had eggs and cream or that the name is a bastardization of either French or Yiddish words. Regardless, it’s a tasty treat.

Ingredients

1/2 cup 2% or Whole Milk (skim or 1% do not foam enough)
2 tablespoons Chocolate Syrup (Fox’s U-Bet is the most commonly used in Brooklyn)
Seltzer

Directions

Some people will tell you to put the milk in the glass and then add the seltzer, stir and add the chocolate after.

I think it’s more fun to put the chocolate in the bottom of the glass, add the milk and then pour in the seltzer while stirring. What you’ll get is a foamy chocolatey soda that’s lighter than an ice cream soda.

My family used to have a Cuban variation of the egg cream that involves putting about 2-3 tablespoons of condensed (not evaporated) milk in a glass and then adding a cola while stirring. Very tasty also, but very very sweet!

I hope you all have a fabulous weekend! See you Monday!
EggCream
Thanks to Jason Perlow for releasing these photos into the public domain.

Upside Down Cornbread Cake and BE MINE Erotic Romance Release & #Giveaway #FoodieFriday

Happy Friday! Woo hoo we made it to the end of the week. I’ve got a busy weekend planned and I hope you have a great one.

Today I’m sharing a recipe that helps handle some of the leftovers from Thanksgiving. I love the Penguin Cornbread Mix from Costco, but always have a lot of it left over after the holiday. While we love cornbread in my house, I wanted to find a way to mix things up.

After checking out a few sites, I came across an upside down cake recipe from the fabulous Sunny Anderson and decided to adapt it to deal with the cornbread mix as well as the fruits I had handy, namely pears, apples and blueberries. You can actually make this with any fresh or canned fruit which is why I didn’t put any specific fruit name in the title. If using canned fruit, make sure to drain it well so you don’t water down the sauce for the topping.

Ingredients

2-3 cups fruit, sliced (except small fruits like blueberries)
1 cup brown sugar
1 stick of butter
1 cup rum/amaretto/or other sweet liquor
1 cornbread mix

Directions

Preheat oven to 350 degrees.

In a small saucepan, melt butter, add 1/2 cup brown sugar and still until dissolved. Add liquor and slow boil until the liquid is a little syrupy.

Make cornbread according to the mix and add the remaining 1/2 cup brown sugar.

Oil 9×13 inch pan. Layout the fruit in the bottom of the pan. Once the butter/sugar/alcohol mixture is syrupy, pour over the fruit. Then pour the cornbread mix over the fruit and syrup.

Bake for 30-45 minutes or until knife comes out clean from the cornbread. Let cool. Once cool, invert the cake onto another plate.

Serve with ice cream and/or whipped cream. The cake is dense and not too sweet. For those who need gluten free, this is a perfect recipe since corn does not have gluten. Just make sure to check the label of your cornbread mix to make sure there are no other products containing gluten.
Upside Down Cornbread Cake

BE MINE Valentine’s Day Erotic Romance Set

As I mentioned the other day, we’ve got an awesome box set for you for Valentine’s Day and it’s only 99 cents for a limited time. Check it out at these retailers:

Amazon: http://bit.ly/AMZBeMine
Amazon UK: http://bit.ly/AMZUKBeMine
Amazon CA: http://bit.ly/AMZCABeMine
Amazon AU: http://bit.ly/AMZAUBeMine
B&N: http://bit.ly/BNBeMine
Kobo: http://bit.ly/KoboBeMine

BE MINE — Ten Erotic Romances for Valentine’s Day features contemporary romance, paranormal romance, military romance, and BDSM romance from today’s New York Times and USA Today bestselling authors. This boxed set is ONLY available for a LIMITED TIME so get your copy before it’s gone.

So…won’t you Be Mine?

Be-Mine-99-Cent-Ad

a Rafflecopter giveaway

Zucchini Lasagna #Recipe

I’ve been trying to watch my carbs because that’s the one thing that really helps me lose weight and feel better. It’s tough, because I’m a carboholic, but recent studies indicate that diets that are lower in carbs are better than diets low in fat.

With that in mind, I’ve curtailed carbs and have lost over twenty pounds. This is, sadly, another of my downs on the roller coaster that is my weight, but still, better to be on the down side of it.

Since it has worked for me, I’ve been playing around with how to lighten the carbs in what would normally be carb heavy dishes, like lasagna. Last week I made a lower carb and lower fat lasagna for a holiday party. I’m sharing the recipe with you today!

Ingredients

4 to 5 medium zucchini, thinly sliced lengthwise
4 cups spaghetti sauce (if you don’t have any homemade, try Classico 4 Cheese Sauce)
2 pounds skim milk ricotta cheese
1 pound skim milk mozzarella shredded
1 cup grated parmesan cheese
1/8 cup chopped fresh parsley
1 egg
Olive oil
Barilla No Bake Lasagna Sheets

Directions

Preheat the oven to 350 degrees.

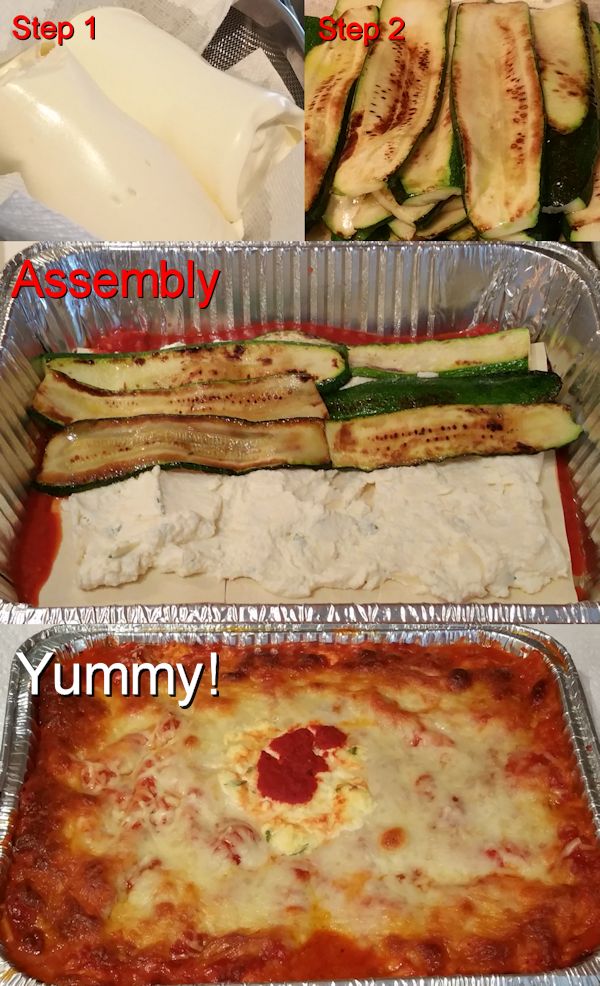
Place paper towels in a colander and empty ricotta onto paper towels. See Step 1 below. This is to help get rid of some of the extra moisture that can make your lasagna runny.

In a non-stick pan with very little olive oil, brown the zucchini slices and place on a paper towel to soak up any access oil. See Step 2. Some recipes call for using the zucchini raw, but again, this creates too much moisture and that brown on them is caramelization that adds flavor to the dish.

In a big bowl, beat the egg, add then add 1/2 cup parmesan cheese, 1/4 of the shredded mozzarella, the parsley and the ricotta. Mix until blended.

Once you’ve got all the zucchini cooked and the ricotta mix done, spray a 9×13 pan with a little oil and do a layer of spaghetti sauce. Just enough to cover the bottom. Add the first layer of Barilla No Bake sheets. I only use these at the top and bottom to strengthen the layers.

Spoon the ricotta mixture onto the lasagna sheets and smooth out. Then arrange the zucchini slices perpendicular to the lasagna sheets. Why perpendicular? To add body to the lasagna so it will hold together. See the Assembly photo below.

Top the zucchini slices with a little spaghetti sauce and 1/4 of the shredded mozzarella. No ricotta this layer.

Add another layer of zucchini slices perpendicular to the first layer. Again, alternate the layout of the slices to help stabilize the layers. Top this layer with some spaghetti sauce, the remaining riccota, and another 1/4 of the mozzarella.

Finish the top of the lasagna with the Barilla lasagna sheets running perpendicular to the layer below this. Smooth spaghetti sauce all over and make sure you cover every inch of the sheets, but don’t make it too wet. Top with the remaining mozzarella and parmesan cheese.

Bake for about 45 – 60 minutes. Let sit for about 30 minutes before serving.

ZucchiniLasagnaSteps

Tex-Mex Soup #Recipe

When I know I’m pressed for time to make dinner, I like to make something that’s easy to re-heat and will do double-duty as a possible lunch item. This week it was time to look in the pantry and see what I could put together for such a meal.

What I came up with was a quick and easy Tex-Mex style soup that I was able to enjoy on multiple days! I hope you’ll like it.

Ingredients

2 cups chopped carrots
1 large onion chopped
1 can black beans
1 can creamed corn (regular corn will do it also)
1 can Rotel Tomatoes & Chiles (This is a new must have in my pantry)
1 small can tomato sauce
8 oz chicken stock
8 oz water
2 boneless chicken breasts chopped
2 tbsp olive oil

Directions

Saute the carrots, onions and chicken in the olive oil. Cook until the chicken is just starting to brown and the onions look translucent.

Drain the black beans and add to the pot. Then add everything else! Simmer for about two to three hours.

That’s it.

You can finish up this soup by adding some cooked noodles or serving it over rice. I love matzoh balls so I made a few of those and tossed them in. Top your finished bowl with some shredded cheddar cheese, chopped green onions and/or sour cream.

I hope you enjoyed this quick and simple Tex-Mex Soup recipe.
TexMexSoup