Shrimp Stir Fry

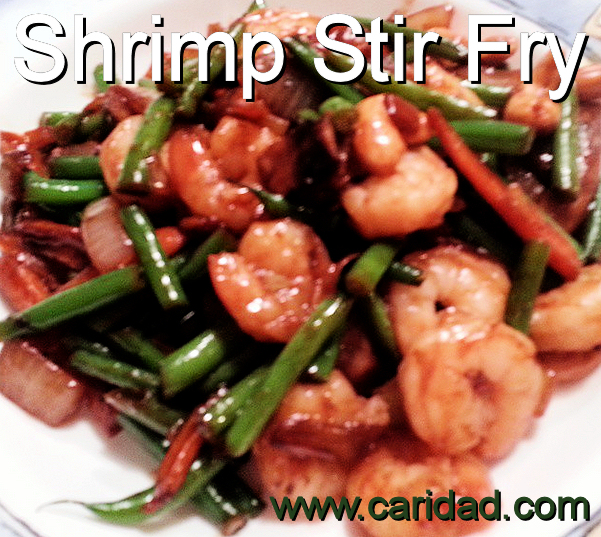
Last week was a clean the fridge out kind of dinner and I had a craving for something Chinese. So I came up with this combination of veggies and shrimp for a quick meal. I always keep pre-cooked frozen shrimp in the freezer since it’s so easy to whip up a meal with them!

Ingredients

2 tbsp peanut oil
1 cup thinly sliced baby carrots
1 1/2 cups sliced mushrooms
1 cup diced onion
3 cloves garlic, crushed and minced
3 cups cooked and sliced string beans
1/2 cup cashews
2 cups pre-cooked frozen shrimp – thawed, tails removed
1 tsp corn starch
1 tbsp sesame oil
1/4 cup teriyaki sauce
1/4 cup low salt soy sauce

Directions

In a wok or big saute pan, heat the oil and start cooking the sliced carrots.

After about 3-5 minutes, add the mushrooms. Keep it on high heat to dry off the moisture the mushrooms emit, otherwise everything will be soggy.

Once most of the mushroom liquid is gone, add the string beans, garlic, sesame oil and cashews. Toss it up and cook for about 5 minutes.

Add the teriyaki and soy sauce. Cook for another few minutes and then add the shrimp to warm it up. Do not overcook at this point. Just 2 to 3 minutes on high heat.

You should have some moisture still in the pan from the shrimp, etc. Mix the corn starch with about 2 tbsp of water in a separate dish. Once the corn starch is dissolved, add that to your shrimp and veggies and stir. Within a minute or so you’ll see the whole mix get a nice glaze to it and the liquid left in the pot should tighten up and not be so runny.

That’s it! Time to eat. You can serve this over white or brown rice, but I’m watching my carbs so I ate it just as it is! This recipe is about 2 hearty servings. You can change it up by adding bean sprouts, water chestnuts, baby corn, etc. or using cooked beef or pork.

Hope you all have a fabulous weekend! See you on Monday (and Tuesday) for our big Seductive Supernatural Release party! We’ll have prizes and more for you!

Also check out our contest at Fresh Fiction which has over $250 in prizes! Woo hoo!
shrimp_Stir_Fry

Lower Fat/Carb Mac & Cheese

Who doesn’t love mac and cheese? It’s the kind of comfort food that warms the belly and calms the soul, but oh man, talk about fat and carbs.

There is a way to cut back on both and still have a hardy and rewarding meal with a little less guilt or worry. This is my version of a lower fat/lower carb Mac and cheese. I hope you’ll enjoy it!

Ingredients

4 cups Cauliflower
1/2 pound pasta
3 tbsp olive oil
1 1/2 cups chopped ham
1 chopped onion
3 cups 1% milk
2 cups cheddar cheese
Panko bread crumbs

Directions

Cut the cauliflower into one inch pieces. I was able to find an orange cauliflower at a local farm stand for only $2.00! Yes, I love being frugal also! Steam the cauliflower until just a little tough to a poke with a fork. It will cook some more when you bake it. After steaming, rinse with cold water to stop the cooking while you assemble the rest of the ingredients.
mac1

Cook the 1/2 pound of pasta until al dente. I used cavatappi since they hold the sauce and add a little fun to the mix. After draining the water, rinse the pasta with cold water to stop the cooking while you assemble the rest of the ingredients.
mac2

Chop the ham and cook in the olive oil to get rid of that extra moisture. Then add the onion and cook until just translucent. Turn down the heat a little and add the flour. Mix it all up until it’s a little on the dry side. If you’re using some kind of cast iron stove to oven pan, this will happen quickly from the pan retaining the heat, so really turn it down until you add the milk.
mac3

Add the milk to the ham, onion, and flour mix. Stir until sauce is thick enough to coat the spoon. Add the cheese and stir. Then add the cauliflower and pasta and mix well.

If you haven’t used a stove to oven baking pan/dish, place the mixture in a greased baking dish. Top with the Panko and if you’d like, some additional cheese. Bake at 350 for 45 minutes and then broil for about 2-4 to brown the top! Voila, you are done!

mac5

Dulce de Leche #FoodieFriday

You see Dulce de Leche everywhere now from ice creams to other desserts. Even a limited edition Dulce de Leche Pop Tart. You know you’ve made it when you’re immortalized in a Pop Tart! LOL!

But for Latins, Dulce de Leche has been around forever. My mom and grandma used to make it all the time for us as kids.

What exactly is Dulce de Leche? Literally translated it means “milk candy” and it is basically a caramel kind of spread made by heating sweetened milk until it changes color and flavor. Technically, that process is known as a Maillard reaction, but forget that! All you need to know is that it’s really tasty.

Also, just to confuse things, Cubans have another dessert called dulce de leche which is made with curdled milk that is then sweetened, but that’s not what we’re going to make today.

Actually, for those who are kitchen-challenged, Dulce de Leche is much easier to find today in the ethnic food section. La Lechera has an assortment of Dulce de Leche products, including one in a squeeze bottle for drizzling onto desserts or straight into your mouth.

How do you make it? Well, it’s both simple and DANGEROUS. I have to repeat DANGEROUS, but that hasn’t stopped Latinos from making it this way for a very long time.

It all starts with . . . Can you guess? It’s that go to in Latin kitchens: Sweetened Condensed Milk.

Why a go to? Well, we weren’t well off and when you needed something sweet, a spoonful of dulce de leche or a cup filled with crumbled soda crackers and topped with condensed milk did the trick.

Plus, it’s a basic ingredient in flan, tres leches, bread pudding, you name it.

But back to making Dulce de Leche and the DANGER of it. The easiest, but DANGEROUS way is to full a large pot with water and drop in an unopened can of sweetened condensed milk.

Bring to boil and boil for about two to three hours. NEVER LET THE POT RUN DRY. If you do, the pressure will build inside the unopened can and it will EXPLODE.

Just ask my poor sister-in-law who ended up cleaning dulce de leche from her ceiling.

So that’s it. Drop and boil and then chill in the fridge. For a thicker darker dulce de leche, boil the can even longer. It will be as thick and dark as peanut butter, but oh so tasty!

Let me know if you try it and if you do, how you like it!

DulcedeLeche

Speaking of sweet, don’t forget these sweet deals going on right now!
SSBCSlider

Just One Night Erotic Military Romance

Tres Leches Cake – Super Easy Style #FoodieFriday

If you’ve been to a Latin restaurant lately, you know that Tres Leches Cake has become a staple on many dessert menus. It’s sinfully sweet and tasty. Coupled with a nice cup of espresso, your meal is complete.

Of course, you can treat yourself by making this cake at home. For those who are expert bakers and love making a cake from scratch, please go right ahead.

For those of us who are a little more challenged, store bought yellow cake mix is the foundation of this super easy Tres Leches cake! For a little Spanish lesson, “tres leches” means “three milks” and it is three different milks that form the sweet soaking mixture in this recipe.

Ingredients

Yellow Cake Mix

2 teaspoons vanilla

1 can sweetened condensed milk (Not evaporated milk!! I like La Lechera, Magnolia or Eagle Brand)

1 cup whole milk

1 cup whipping cream

Directions

Follow the boxed cake mix directions, but add the 2 teaspoons of vanilla to the cake mix. Bake in a 13×9 inch pan following the cake mix instructions.

Once baked, cool the cake.

Combine the condensed milk (not evaporated), whole milk and whipping cream together until smooth.

With a fork, poke some holes into the top of the cooled cake in the pan. Do not remove the cake from the pan.

Slowly pour the three milk mixture over the cake, letting it soak in. You may have to repeat this step several times until the cake is soaked in.

Cover the cake and let sit overnight to really let it soak in. Before serving, top with whipped cream and cherries!

That’s it? Easy right? I hope you try it and out enjoy this super easy Tres Leches cake recipe.

Want to be daring and mix things up a little? Try adding Frangelico (hazelnut flavor), Amaretto (Almond) or an orange liqueur to the milk mixture for a little but of pop!

Have a great weekend!

tresleches

Blueberry Walnut Pancakes #FoodieFriday & a Guest Blog

It’s Friday! Let’s get the party started with two two two things today!

First, please take a moment to visit with me at Houston Havens blog where I’m going to have a little something for you about my latest release, Just One Night.

Please take a moment to leave a comment there about whether or not you like military heroes like Jase.

Speaking of Jase, today’s #FoodieFriday is in his honor. At the end of Just One Night, Jase, Nickie and their families are having a goodbye breakfast for Jase. Since it’s a special meal, Jase gets his favorite for breakfast – Blueberry Walnut Pancakes.

Now, I have to confess: When it comes to pancakes, it’s a boxed mix for me and then I just improvise by adding other ingredients. In this case, about a cup of blueberries and half a cup of chopped walnuts.

If you want to be adventurous and totally make them from scratch, check out all these recipes at Yummly!
BlueberryWalnutPancakes

Creamy Cheese Grits #FoodieFriday

Being a Southern girl (Cuba is pretty far South you know), I love grits in all forms. Whether for breakfast, lunch or dinner, if grits are on the menu, you can be sure I’ll ask for them.

Now, I know many of you either don’t like or haven’t tried grits, but seriously try this recipe! You’ll love it and you can change it up by changing up the amount of milk/half-and-half/water and the kind of cheese you’re using.

So here goes with today’s #FoodieFriday Recipe.

Creamy Cheese Grits

4 cups whole milk (you can change this up to be 2 cups milk, 2 cups water; 2 cups half-and-half, 2 cups water, etc.)
1 cup coarse ground grits (not instant)
1 tsp salt
2 tbsp unsalted butter
4 oz grated cheddar cheese (for some spiciness use Montery Pepper Jack cheese)

Warm the milk and add the grits, salt and butter. Gradually bring to a low boil, stirring all the time. Stir until smooth and creamy and the grits are soft – about 20-30 minutes. Add the cheese and stir again until the cheese is incorporated and creamy.

That’s it! Pretty simple and you can serve it with eggs for breakfast. If you cool it and place it in a baking dish, you can slice and grill it to serve as a side dish to dinner.
yellow corn grits